CRAFT

CRAFT
verb: to make or produce with care, skill, or ingenuity
Showing posts with label acrylic. Show all posts

Saturday, August 25, 2018

We're Not Playing Games Here

What do you do when things don't work out the way you planned? 
You play tiddlywinks!
Just kidding!
Here's the real story.  
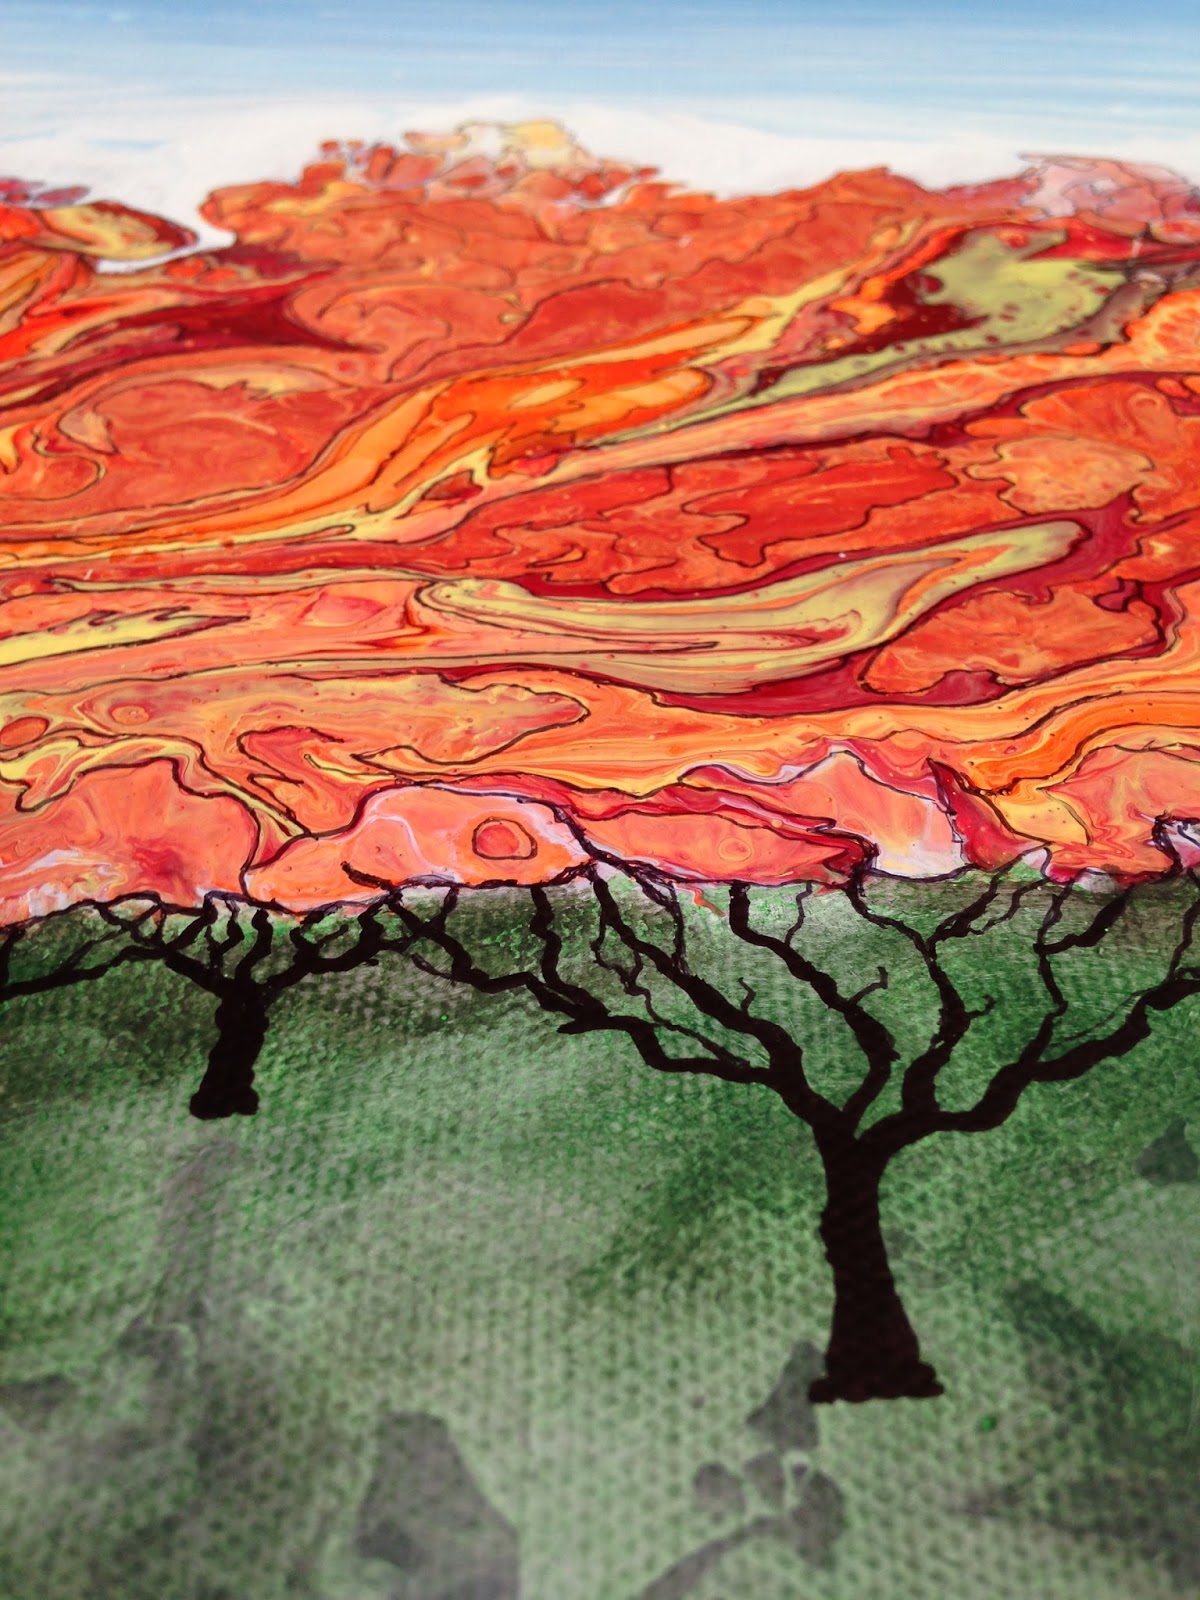
I've been making stencils on my sister's Cricut.  I have found that copier transparencies work pretty well but are prone to tearing at weak spots.  So, I was trying out different materials. I had a piece of thicker plastic for which I had high hopes.  I set it all up, using a fairly intricate tree pattern. Fingers crossed, I pushed the go button and watched the cutting arm maneuver back and forth, up and down.  About 5-10 minutes later it was done.
Fail.
What I had at the end was a piece of plastic with a lovely design of groves which didn't go all the way through.  
Of course, if I had tried it out on a sample piece first, adjusting the settings, It might have worked.  
Oh well.

I set it aside and went back to using the transparencies. 
This one left me with a whole pile of little plastic dots which I just couldn't throw away.
 

I tossed a handful on a 12" gel plate, covered it all with pink and yellow paint, and pulled a print.

It's amazing the texture you can get from smooth plastic.

I loved it, but of course, one thing leads to another.  Especially in gel printing.  I thought some larger circles could be fun.  And then I saw that failed stencil laying there.  
I cut that loser into a bunch of circles!
Here you can see the etched lines.  I had a hunch they might show up in the prints.

And boy, did they ever!  So cool!

And the playing of "tiddlywinks" ensued.

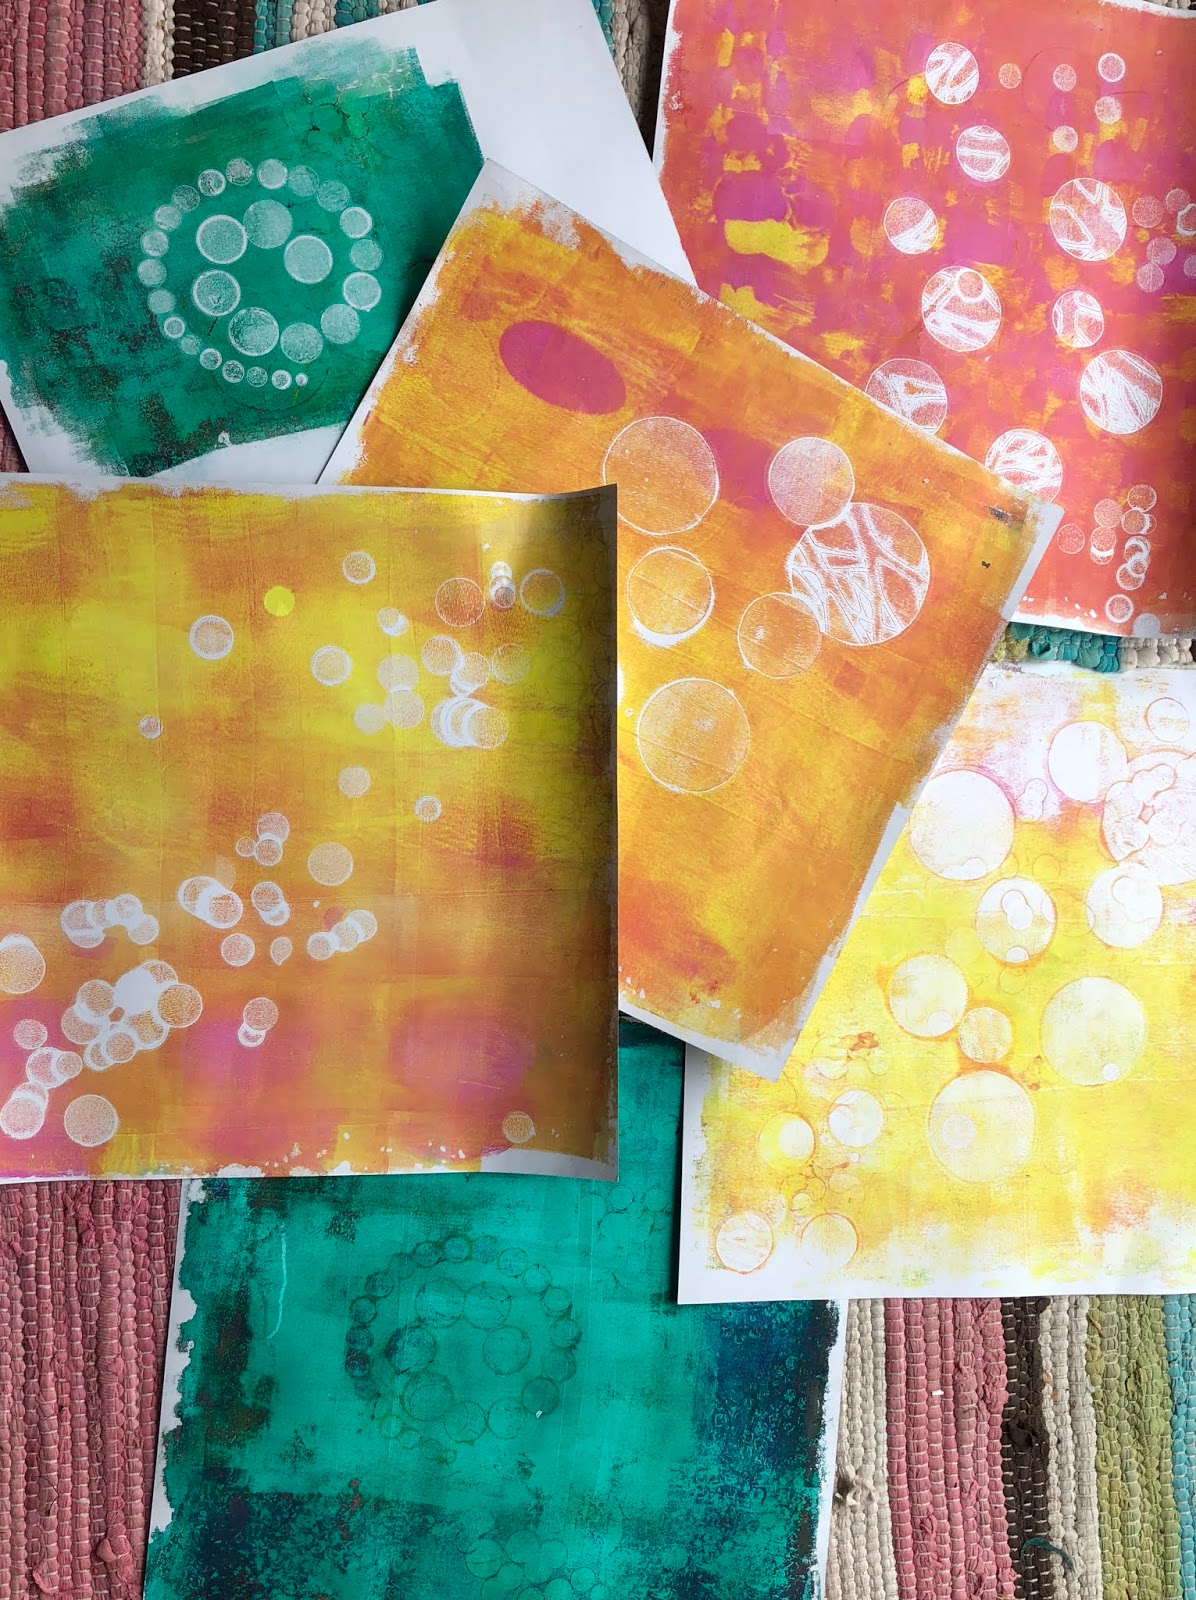
A big advantage to putting the stencils down before the paint is not having to hurry; you can think and rearrange to your heart's content without fear of drying paint.
The one down side to this is having to remove all the circles at the end but I think it might be worth it.
'


Tuesday, March 20, 2018

Hiding In Cyber Space


I have had several requests for information on how I created my latest self portrait.  So, here goes.

I had this painting.  
It had been crying for embellishment of some kind.
While I am a sympathy crier, I'm also someone who hates to cry.   Go figure.

So, I just had to make it stop.

Autodesk SketchBook to the rescue.
The following are the steps I took to get the finished selfie.


1.  Upload photo of painting.

This was by far the easiest step in the process.  This became layer one.

2.  Upload selfie photo.

This was the hardest step.  First, because taking selfies is something I hate doing.  Second, lining up the two layers so that my eye was just where I wanted it was tricky and took several tries.  Once I was satisfied with placement, I set the selfie layer at about half opacity; just enough to be able to see both layers.  I erased  the parts of the selfie I wanted hidden behind the... curtain?...  waterfall?  I'm leaving that up to the viewer.

Here is layer 2 alone

3.  Draw in details.

I will admit, this step felt like cheating.  I was just tracing, after all.  But after thinking about it   for a second   for a while  too long, I decided this project wasn't about my ability to draw; it was about composition and combining media.

All three layers together.

I have to say, I find "cyber arting" to be quite satisfying. It lets you have your cake and eat it too. I have a finished piece, but my original painting is untouched, ready for another go.

I've titled this Hiding In Cyber Space, but maybe it should be Thinking Of An Encore. 

Wednesday, February 21, 2018

A Whole Other Country!

This is a lesson in flexibility.  
The willingness to change or compromise.  The ability to be easily modified.


I love the work of Rebecca Vincent. The perspective she achieves with simple bands of color is wonderful.  I don't know what techniques she uses but I thought pouring and swiping could give similar results.  And the February pouring challenge was stripes.  Perfect.


I started with a landscape I had poured a while back, which hadn't turned out great, but had a lovely sky.  I poured vertical lines of paint on the bottom two thirds and then swiped and manipulated with a pallet knife.

To be honest, at this point I was thinking it was kind of ugly.  And it didn't look anything like what I was going for.  But, I let it dry and then went upstairs for a second opinion.  No, I don't mean I prayed about it.  😇  I showed it to my sister who said it made her think of Na Pali in Hawaii.


So I googled it.
Well, would you look at that!

Okay, time for that flexibility I was talking about.  
Instead of going to farm country, we're going to a tropical island.

Add a few waterfalls.

And sand and water.

And we're in a whole other country!


Wednesday, January 24, 2018

Lean In

Did you read the previous post?  Did you guess which painting would get the makeover?

When I finished this pour, I was pretty sure I'd be using it as a background or changing it in some way.  While it has an impressive number of cells, it seemed to lack structure or focal point.  So I set it aside until one day I glanced at it, not really thinking about what to do with it, when I began to see something.  Do you see it?


I'll give you a second,


or two.


Okay, time's up.  Here's a hint.
I could have left it at that but I decided I wanted color.

I tried out several ideas on Autodesk.

Using acrylic washes is a bit tricky.  I wanted to be able to see the details of the underpainting, but still have true, even colors. 

I may tweak it a bit more, but for now I'm calling it done.  
Wait, no, I'm calling it Lean In.
I lived in Kansas for about 25 years. 
Kansas, named for the Kansa Tribe, aka People of the South Wind.
I learned the best way to keep your footing in the wind is to lean into it.


Tuesday, January 16, 2018

Challenges

We all face them from time to time. Sometimes they're welcomed; other times, not so much.

One kind of challenge I welcome is an art group challenge.  It can give direction, boundaries; helpful when the options are vast.

I recently participated in a pouring group challenge:  create a piece, using any acrylic pouring technique, but using only blacks and whites.

First I tried out a technique using string dipped in paint and pulled across wet paint.  A lot of fun. 
Some of the details are so pretty.

Next, a dirty flip cup.  It went mostly grey but I got a gazillion cells. Go ahead, count 'em.
And last, but not least, a puddle pour. Oh the drama!
I'm still amazed at the variety achieved, even when using the same materials.  

Speaking of challenges, this post started out with a different idea but because I find keeping my focus and staying on topic a challenge, it went a different direction.  No worries!  Come back for my next entry when I get back on track.  Hint: one of the paintings above got a makeover.


Wednesday, January 3, 2018

Test, test, this is a ...

I love it when a simple test swatch produces such fun results. I was just testing some custom mixes for a black and white challenge. I dribbled some of each on a 4 inch square of paper. After a little swiping and swirling, I ended up with this:

I usually take few pictures of the results, just in case. And I'm often rewarded. This time I didn't see it at first. Really.  But once I did, I couldn't not. 


So, I just had to play with it 😉 in Autodesk. 


If only it wasn't the size of a postage stamp!


Saturday, December 2, 2017

Greetings and Salutations


And thank-yous and thinking-of-yous.
I made cards!

My supplies:
Plain notecards, gel medium, sharpies and gel pen.

My pallet:
Little snippets of paint skins.

My process:
 I started by selecting coordinating pieces in varied sizes and adhered them to the card stock with gel medium.

Next came the doodling:
 sometimes penciling in ideas first, 
sometimes getting a little help from Autodesk Sketchbook.
e-sketch

Finally, it was time to commit and pick up the permanent markers.
Most were flowers.  Some had borders.


And then some mushrooms sprouted!


Tuesday, November 7, 2017

Finished Before I'm Done?

To be honest, sometimes I feel that way about life.  I would imagine everyone feels that way once in a while.  However, that's a little too deep and serious and not really the direction I was going with this post.  

I was thinking more along the lines of how do you know when an art piece is done.  I mean, you can't just stick a fork in it!  Well, of course, you can if that's the look you're going for.  But you know what I mean!

I've debated this question with just about every piece I've ever done.  It seems there's always more that can be added, tweaking that can be done. But how does one know when to quit?  

Good question!

This is just the beginning, so obviously, not yet.

The sky and ground were poured on and moved around with my hand.  The middle is a mix of orange yellow and red dirty poured into puddles.

A little tipping and tilting to spread the puddles and a little blowing with a straw to mess up the straight edges.  Now, at this point, I suppose I could have called this Autumn Abstract and been done with it but that wasn't the look I was going for.

The grass is always greener if you paint it that color!  You may be asking why I didn't use green in the first place, instead of purple.  I was playing around with the idea of dappled shadows under the trees, knowing that I'd probably do a green wash over it.

After playing with some ideas in Autodesk I used a sharpie to doodle on the leaves and create the trunks and branches. I also used a white gel pen on the sky.


At this point, I was considering it done and it could have been.  But every time I looked at it it seemed something was missing.
So I did what usually do: I asked someone else to tell me what to do.  Well, not exactly.  But I did ask my daughter to offer her opinion.  Sometimes having fresh eyes look at what you've been staring at can help.
Is it done?  It could be.
Am I finished? Maybe.